


Quick Answer
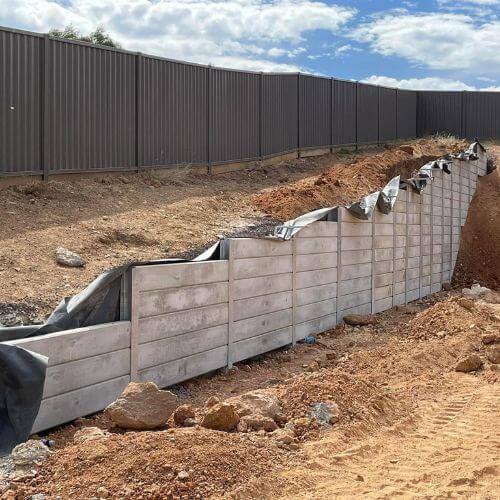
Installing woodgrain concrete sleepers follows the same process as any concrete sleeper wall: set out and dig post holes, concrete the posts in at the correct depth and spacing, add drainage behind the wall, then slide the sleepers into place from the bottom up. The woodgrain finish doesn't change the installation process at all — it's purely cosmetic. For walls over about 1.0m, near boundaries, or carrying a driveway, engineering and council approval are typically required, so it's worth confirming those requirements with your local council before you start digging.
This guide walks through the materials you'll need, how to install posts and drainage correctly, and how the sleepers themselves go in — enough detail to plan a DIY build or to understand exactly what a contractor should be doing on your site, whether you're building a single garden bed border or a longer, taller boundary wall.

Materials You'll Need
Before starting, gather the full materials list — running short partway through a build is one of the most common and avoidable delays.
- Woodgrain concrete sleepers, sized and strength-graded for your wall height and soil type
- Galvanised steel posts, spaced according to your engineering spec
- Concrete for post footings
- Ag pipe, geotextile fabric and free-draining gravel for drainage
- String line, pegs, spirit level, tape measure and a post-hole auger or shovel
Tools Worth Having on Hand
Beyond the core materials, a few tools make the process considerably smoother: a post-hole auger (hired or borrowed) saves significant time and effort over hand-digging, especially for multiple post holes at depth. A spirit level and string line are essential for keeping posts plumb and the wall face straight. A circular saw with a masonry blade is useful if any sleepers need cutting to length at corners or wall ends. Having everything on-site before you start avoids the frustration of a hardware run partway through a job.
A Practical Materials Checklist
It helps to physically tick off materials against your calculated quantities before digging starts, rather than discovering a shortfall once posts are already in the ground. Confirm sleeper count (including a wastage margin), post count matched to your spacing plan, sufficient footing concrete for the number and depth of post holes, and enough drainage materials — ag pipe, geotextile fabric and gravel — to run the full length and height of the wall's drainage zone. A short delay at this stage to double-check quantities is far less disruptive than a delay mid-build waiting on a top-up delivery. It's also worth confirming delivery timing against your planned start date, particularly for larger orders, so materials are on-site and ready when you need them rather than causing a hold-up on day one.
Confirming Your Spec Before You Dig
Before any digging starts, confirm your sleeper thickness, strength grade, and post spacing against your wall's retained height and soil type. This is also the point to confirm whether your wall needs council approval or engineering sign-off — walls over about 1.0m, near boundaries, or carrying a driveway commonly do, and it's far easier to sort this out before you dig than after the wall is partway built.
Checking for Underground Services First
Before digging any post holes, arrange a check for underground services in the area — electrical, water, gas, or communications lines can run through a yard in places that aren't obvious from the surface. This is a straightforward, usually free step that removes a genuinely serious risk from the project, and it's worth doing even on a small, low garden wall where you might otherwise assume the risk is minimal. In Australia, this check can typically be arranged online or by phone well before your planned start date, so there's no reason to skip it for the sake of convenience.
Installing the Posts
Posts are the structural backbone of the wall, and getting them right is the single most important part of the build.
Setting Out the Wall Line
Start with a string line along the intended wall face to mark a straight, accurate reference line. Mark post positions along this line at your required spacing, checking for square corners using the 3-4-5 triangle method if the wall has any returns or corners.
Digging and Setting Posts
Dig post holes to the depth required for your wall height and soil type — as a general rule, post embedment should be at least one-third of the post's total length, though your specific engineering requirement may call for more in reactive clay or taller walls. Set each post plumb using a spirit level, then fill the hole with concrete and allow it to cure fully before proceeding — typically at least 24 hours, longer in cooler weather.
Getting Post Spacing Consistent
Consistent post spacing matters more than it might seem, since sleepers need to seat correctly into each post along the full wall run. Measure and mark all post positions along the string line before digging any holes, rather than digging one hole and then pacing out the next by eye — small spacing errors compound over a long wall run and can leave a final post position awkwardly close to or far from where a sleeper joint actually needs to land. This is a five-minute planning step that prevents a genuinely frustrating problem discovered only once you're several posts into the dig.
Choosing 100 Series or Heavier
Our 100 Series steel posts suit most standard residential walls in stable, well-drained ground. Taller walls, reactive clay, or walls carrying a driveway or other surcharge load generally need a heavier post series, closer spacing, or both — confirm this against your specific site before ordering posts.
Checking Plumb in Both Directions
It's easy to check a post is plumb when looking at it face-on but forget to check the other axis. Use a spirit level against both faces of the post — parallel to the wall line and perpendicular to it — before the concrete sets, since a post that's plumb in one direction but leaning in the other will throw the whole wall face out of alignment in a way that's much harder to correct once the footing has cured.
Common mistake: starting to place sleepers before post concrete has fully cured. Posts that shift under load before the concrete has set can throw the whole wall out of alignment. Give footings the full cure time recommended for the concrete product you're using before applying any load to the posts.
Getting Drainage Right
Drainage is the part of the build most likely to be rushed or skipped — and the part most responsible for wall failure when it is. For the full technical detail on ag pipe sizing, fall requirements and outlet options, see our retaining wall drainage guide, which covers this in more depth than we will here.

The Basic Drainage Sequence
- Lay geotextile fabric against the excavated soil face, behind where the sleepers will sit
- Install slotted ag pipe along the base of the drainage zone, with fall toward a discharge point
- Backfill with free-draining gravel between the fabric and the sleeper face as the wall goes up
- Wrap the fabric over the top of the gravel layer to stop soil migrating in from above
Why Fall and Discharge Point Matter
Ag pipe only works if water actually has somewhere to go. Install the pipe with a consistent fall along its length toward a clear discharge point — a stormwater connection, a garden bed positioned to handle the outflow, or another approved drainage point. An ag pipe installed flat, or one that discharges into a spot that simply pools water against another part of the property, doesn't solve the drainage problem; it just relocates it. Plan the discharge point before you start laying pipe, not as an afterthought once the pipe is already in the trench.
Why Drainage Can't Be an Afterthought
Drainage needs to go in as the wall is built, layer by layer, alongside the sleepers — not added afterwards. Trying to retrofit drainage behind a completed wall is difficult and often impractical, which is exactly why it needs to be planned and installed as part of the sequence, not treated as a final step once the sleepers are in.
Choosing the Right Backfill Gravel
Not all gravel is suitable for drainage backfill. Free-draining aggregate with minimal fine particles allows water to move freely down to the ag pipe; a gravel with too much fine material can behave more like the surrounding soil and defeat the purpose of the drainage layer. If you're unsure what to specify, ask your supplier for a drainage-grade aggregate specifically, rather than assuming any gravel product will do the job equally well.
Placing and Finishing the Sleepers
With posts set and drainage underway, the sleepers themselves go in relatively quickly.

- Starting from one end, slide the first course of sleepers into the post channels, checking each is level before moving on
- Continue course by course, adding drainage gravel behind each course as you go rather than leaving it until the end
- Check the wall face periodically with a spirit level and string line to catch any drift early, rather than after several courses are in
- Cut sleepers to length at corners or wall ends as needed, keeping cuts clean and square
A Note on Handling Woodgrain Sleepers
Handle woodgrain sleepers the same way you would any concrete sleeper — carefully, and ideally with two people for anything beyond the lightest sizes, given their weight. There's no special handling requirement specific to the woodgrain finish; the textured face is durable and won't be damaged by normal handling, though it's still worth avoiding dragging sleepers across hard surfaces, which can chip any concrete finish regardless of texture.
Working Bottom to Top, Course by Course
Sleepers should always go in from the bottom course upward, never skipping ahead to place a higher course before the one below it is properly seated and level. Each course relies on the one beneath it being correctly positioned, and working out of sequence makes it much harder to catch and correct small levelling errors before they compound up the wall face.
Protecting the Woodgrain Finish During the Build
While the textured finish is durable once cured and installed, it's worth taking basic care during handling and construction — avoiding scraping sleepers against each other unnecessarily, and keeping equipment like shovels or bars away from direct contact with the finished face where practical. Minor handling marks are rarely visible once a wall is complete and weathered slightly, but a bit of care during the build keeps the finish looking its best from day one.
The Full Build Process, Start to Finish
For the complete step-by-step build sequence — from initial site assessment through to backfilling and finishing — our existing how to build a concrete sleeper wall guide covers the full process in more detail than we'll duplicate here. The woodgrain finish doesn't change any step in that process; it's a like-for-like installation with any other concrete sleeper finish, from site setup through to the final backfill and clean-up.
When to Call In a Professional
DIY installation is realistic for straightforward, low walls in stable ground with good access. Once a wall approaches heights requiring council approval, sits on reactive clay, needs to support a driveway, or the site has difficult access, professional installation — or at minimum, a professional design — is the more sensible route. The cost of getting a demanding wall wrong, structurally or in terms of compliance, generally outweighs the labour savings of doing it yourself.
Realistic Timeframes for a DIY Build
For a first-time DIY builder, it's worth budgeting more time than you'd expect for each stage: setting out and digging typically takes longer than anticipated, especially in heavier soils or where an auger struggles with rock or roots. Allowing proper cure time for post footings adds at least a full day before sleeper placement can begin. Drainage installation, done properly layer by layer as the wall goes up, also takes longer than simply stacking dry sleepers would. A realistic timeline, built in stages with appropriate cure time factored in, avoids the frustration of an overly ambitious single-weekend plan that has to be abandoned partway through.
Weather and Timing Considerations
Concrete footings need dry, reasonably mild conditions to cure properly — very hot, very cold or very wet weather can all affect cure time and quality. Similarly, digging in saturated ground after heavy rain is both harder and more likely to result in unstable, collapsing hole walls. Where possible, plan a build around a forecast of settled weather, particularly for the post-setting stage, since this is the step most sensitive to weather conditions.
FAQs
Does the woodgrain finish change how sleepers are installed?
No. Installation is identical to any other concrete sleeper finish — the woodgrain texture is purely cosmetic and has no bearing on how the sleepers are placed, handled or fixed into posts.
How deep do posts need to be embedded?
As a general guide, post embedment should be at least one-third of the post's total length, though your specific wall height and soil type may call for more. Confirm exact depth against your engineering requirement rather than relying on a general rule alone.
Can I install a woodgrain concrete sleeper wall myself?
For low, straightforward walls in stable ground with good access, yes — many DIY homeowners do. For taller or more demanding walls, particularly anything requiring council approval or engineering sign-off, professional installation is the safer and often more cost-effective route overall.
What happens if I skip drainage to save time or money?
Skipping drainage significantly increases the risk of wall failure over time, since water pressure building up behind an undrained wall is one of the leading causes of retaining wall problems. Drainage is not optional on a structural retaining wall, regardless of sleeper material or finish.
How long does it take to build a woodgrain concrete sleeper wall?
It depends heavily on wall length, height and site access, but a realistic DIY timeline should allow for setting out, digging, post curing time, drainage installation and sleeper placement across multiple stages rather than a single continuous session — especially once footing cure time is factored in.
Do I need to check for underground services before digging?
Yes, always, even for a low garden wall. Underground electrical, water, gas or communications lines can run through areas that aren't obvious from the surface, and a free service check before digging removes a genuinely serious risk from the project.



Leave a comment (all fields required)