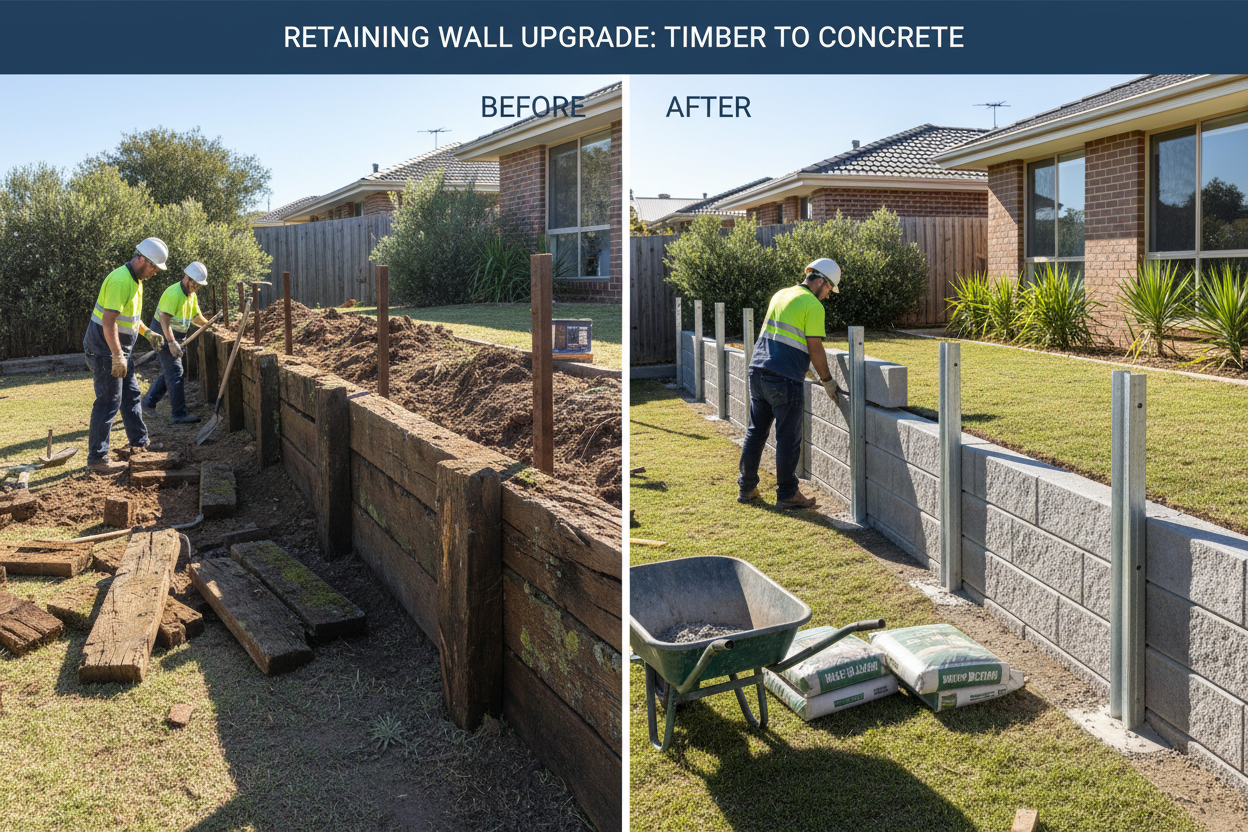

Timber sleeper retaining walls have a finite lifespan. In most Australian conditions, treated pine sleepers last 10–15 years before the timber begins to rot at the base, the posts corrode, and the wall starts to lean, bow, or fail. If your timber wall is showing signs of failure, replacement is almost always the right call — repairs to a failing timber wall are rarely cost-effective and don't address the underlying cause.
This guide covers how to assess a failing timber wall, how to plan the replacement, and how to build the new concrete sleeper wall correctly — including the drainage that the original wall almost certainly didn't have.
Signs Your Timber Retaining Wall Needs Replacing
- Leaning or bowing — the wall face is no longer vertical. This indicates post rotation under soil pressure, typically caused by post corrosion at ground level or inadequate original embedment depth.
- Rot at the base of sleepers — timber rot starts at the soil contact zone and works upward. If the bottom course of sleepers is soft, crumbling, or discoloured, the wall is failing from the base up.
- Post corrosion — timber posts (or steel posts in older walls) corroding at ground level. Once the post cross-section is significantly reduced by corrosion, the wall has lost structural capacity.
- Gaps between sleepers — sleepers shifting or dropping as the posts rotate or the timber shrinks and checks.
- Soil movement behind the wall — subsidence, cracking, or movement in the garden bed or driveway above the wall.
- Water weeping through the wall face — or conversely, no water coming through weep holes during rain, indicating blocked or absent drainage.
Can I Repair Instead of Replace?
In most cases, no. A timber retaining wall that is leaning, bowing, or showing rot at the base cannot be effectively repaired. The structural failure is in the posts and the base of the sleepers — the parts that are hardest to access and replace without effectively demolishing and rebuilding the wall anyway.
The only situation where repair makes sense is if the wall is structurally sound but a small number of sleepers have surface damage. If the posts are plumb, the wall face is vertical, and the damage is cosmetic, targeted sleeper replacement may be worthwhile. But if the posts are rotating or the base is rotting, replace the wall.
Planning the Replacement
Check council requirements
Replacing an existing retaining wall may require council approval, particularly if the new wall will be taller than the original, near a boundary, or in a flood or heritage overlay. Check with your local council before starting. See our guide on retaining wall height limits and council approval.
Upgrade the specification
The original timber wall was almost certainly underspecified by today's standards — inadequate post embedment, no drainage, and timber that was never going to last. Use the replacement as an opportunity to build the wall correctly. This means:
- Correct post type and size for the wall height and soil conditions — see our guide on C-channel vs H-beam posts
- Correct post embedment depth — see our guide on how deep posts should be
- Full drainage system — ag pipe, geotextile fabric, drainage aggregate, and weep holes
- Correct sleeper thickness for the wall height — see our guide on 75mm vs 100mm sleepers
Get engineering sign-off if required
If the wall is over 1.0m, near a boundary, or retaining a driveway or structure, get engineering sign-off on the new specification before ordering materials.
Step-by-Step: Replacing a Timber Retaining Wall
Step 1 — Excavate and remove the retained soil
Before demolishing the old wall, excavate the soil from behind it to reduce the load on the failing structure. This makes demolition safer and gives you access to the drainage zone. Stockpile the excavated soil away from the work area — you'll need it for backfill later.
Step 2 — Demolish the old wall
Remove the old sleepers first, then extract the old posts. Timber posts can often be rocked out of the ground once the sleepers are removed. Steel posts in concrete footings may require a post puller or excavator. Dispose of old treated pine sleepers through a licensed waste facility — treated pine contains preservative chemicals and cannot go to general landfill in most states.
Step 3 — Assess and prepare the subgrade
Once the old wall is out, assess the soil condition. Look for signs of waterlogging, soil movement, or contamination. If the soil is heavily waterlogged or unstable, address the drainage issue before building the new wall. In severe cases, a geotechnical assessment may be warranted.
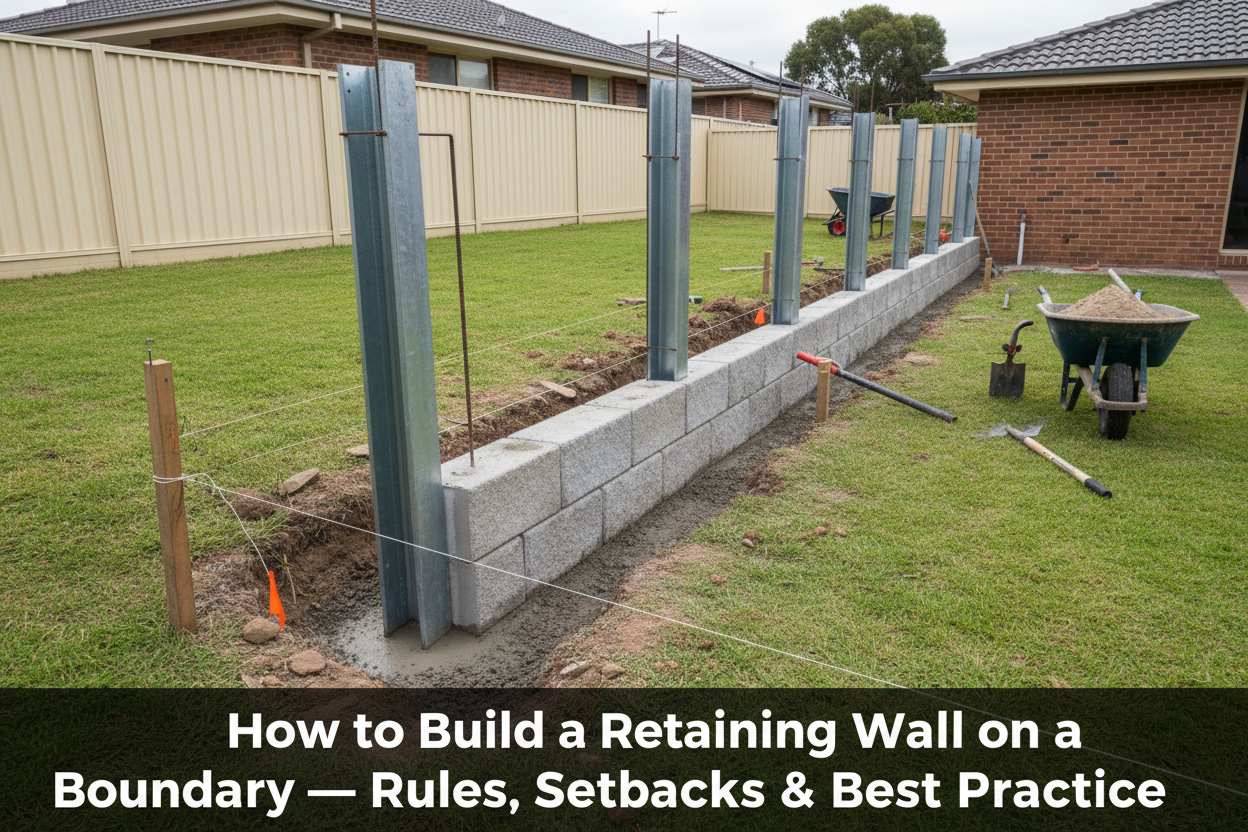
Step 4 — Install new posts
Set new posts to the correct embedment depth in concrete footings. Check plumb in both directions and brace temporarily while the concrete cures. See our guide on retaining wall footings. Browse our full steel post range.
Step 5 — Install drainage before the sleepers go in
This is the step the original wall skipped. Install geotextile fabric against the excavated soil face, lay ag pipe at the base with a fall to a suitable outlet, and prepare the drainage aggregate zone. See our full guide on retaining wall drainage. Our drainage kits include everything you need.
Step 6 — Install concrete sleepers
Slide sleepers into the post channels course by course from the bottom up. Install weep holes in the lowest course. Check level on each course before proceeding. Browse our full range of concrete sleepers in charcoal, woodgrain, and smooth finish.
Step 7 — Backfill and finish
Backfill in compacted layers of 200–300mm. Maintain the drainage aggregate zone behind the sleepers. Fold geotextile fabric over the top of the drainage gravel before backfilling with soil above the drainage zone.
Why Concrete Sleepers Are the Right Replacement Choice
Replacing a timber wall with concrete sleepers and galvanised steel posts means you won't be doing this again in 10–15 years. Concrete sleeper walls are designed to last 50+ years in Australian conditions — the same wall your grandchildren will inherit. See our full comparison of concrete vs timber sleepers.
Ready to Order?
Browse our full range of concrete sleepers, steel posts, and drainage kits, or contact our team to confirm the right specification for your replacement wall.